Create Sparkling Sea Glass Christmas Tree in Simple 4 Steps
A sea glass Christmas tree is a beautiful and easy way to add a coastal touch to your holiday decor. Imagine the soft glow of frosted glass pieces shimmering like ocean waves, creating a peaceful and unique vibe in your home. Whether you want to brighten up your living room, a cozy corner, or even your dining table, a sea glass Christmas tree brings a beachy charm that fits perfectly with the season’s spirit.
What makes these sea glass Christmas trees so special is the way the glass catches the light, reflecting it in the most magical way. Plus, they’re super fun to make! You don’t need to be a craft expert to create one—just gather your supplies, grab a foam cone, and you’re on your way to making a stunning holiday piece.
Not only do sea glass Christmas trees make gorgeous decorations, but they’re also wonderful conversation starters. Imagine guests admiring your handmade creation and asking about the process. It’s a great way to show off your DIY skills, and they make fantastic gifts too! Whether it’s for someone who loves coastal decor or enjoys personalized gifts, this tree is bound to impress.
In this guide, I’ll walk you through each simple step to make your own sea glass Christmas tree. From choosing your materials to adding the perfect starfish topper, I’ll help you make sure every detail shines. Whether you’re a seasoned DIY lover or just starting out, this project is easy, fun, and something you’ll want to keep in your holiday decor for years to come.
Ready to create a beautiful sea glass Christmas tree? Let’s dive in and add some holiday sparkle to your home!
How To Make A Sea Glass Christmas Tree
Making your very own sea glass Christmas tree is a lot more fun and easier than you might imagine! With just a few simple supplies and a little creativity, you’ll have a stunning tree that adds a beautiful, coastal vibe to your home’s holiday decor. Let’s take a step-by-step look at how to create your own magical sea glass Christmas tree.
HSupplies
Before you begin crafting your sea glass Christmas tree, let’s make sure you have everything you need. You can find most of these materials at your local craft store, or you might already have some items at home. Here’s a quick list of what you’ll need:
- A foam cone (this will be the base of your tree)
- Sea glass (you can find some online or collect it from the beach)
- Hot glue gun and glue sticks
- A cute starfish or other decorative topper
- Scissors (to trim the sea glass if needed)
- Optional: Glitter, beads, or other fun accents to add a little extra sparkle
Assemble the Christmas Tree
Once you’ve gathered your supplies, it’s time to bring your sea glass Christmas tree to life! Start by securing your foam cone on a flat surface. This will be the base for your tree, so it’s important to make sure it’s stable. Begin at the bottom of the cone and apply a layer of hot glue. Attach the first pieces of sea glass, making sure they’re spaced evenly and stuck down well.
Continue working your way up the foam cone, adding more layers of sea glass. Don’t be afraid to overlap the edges of each piece a bit—that way, the foam cone won’t show through, and you’ll create a smooth, uniform look. You can mix and match different sizes and shades of sea glass to make your tree feel even more lively and unique.
Star Tree Topper
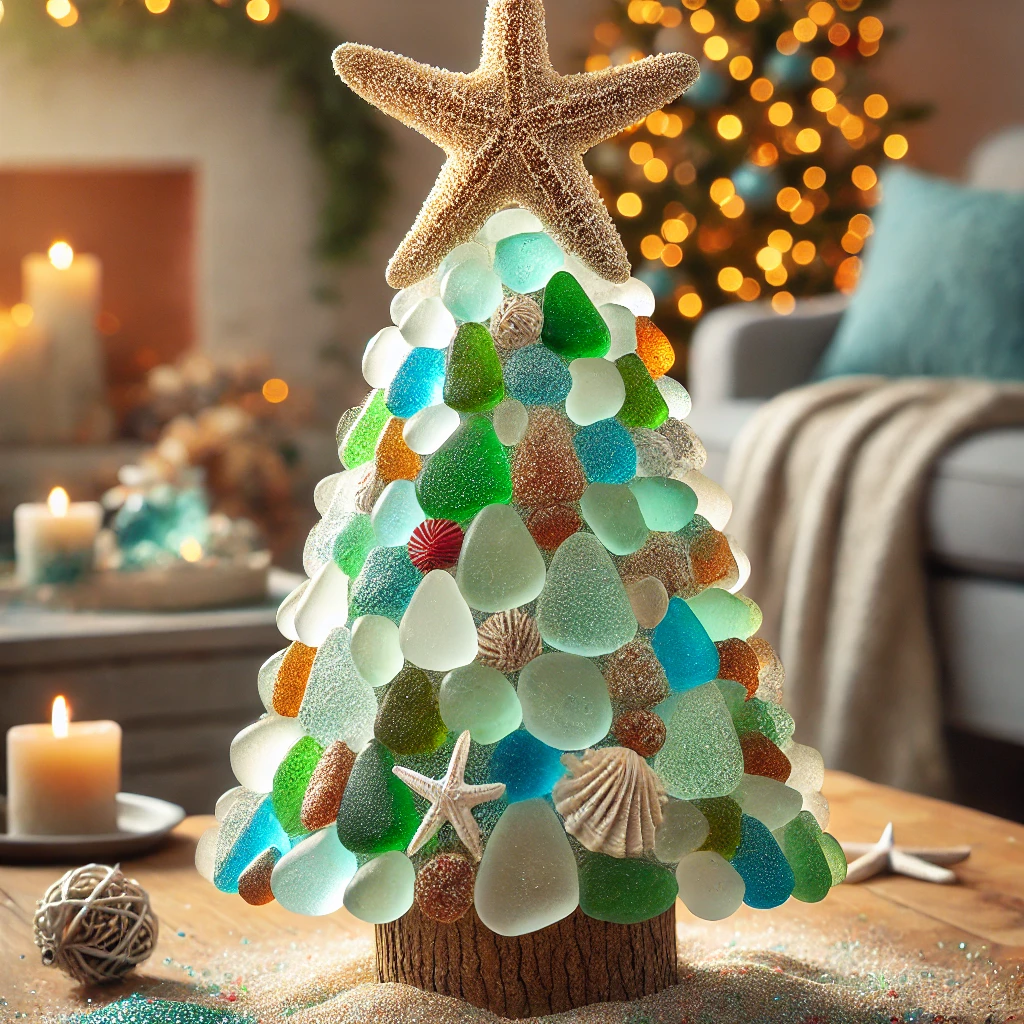
The final touch to your sea glass Christmas tree is the star tree topper! A starfish works perfectly for a beachy, coastal theme, but feel free to get creative with your topper. You could also use a small star ornament, some seashells, or even a lovely bow tied from ribbon. Just make sure your topper is securely glued at the top of the tree to finish it off beautifully.
Now, step back and admire your stunning creation! Your sea glass Christmas tree is ready to shine, whether it’s displayed on your mantel, a table, or wherever else you want to add that touch of coastal charm to your home this holiday season.
How To Make A Christmas Tree Ornament
Creating sea glass Christmas tree ornaments is a fun and easy way to add extra charm to your holiday decorations. These ornaments are perfect for bringing a coastal, beachy feel to your home, and they can be personalized to suit your tree’s style. Whether you hang them on your sea glass Christmas tree or on your main holiday tree, they’ll add a sparkling, unique touch that catches the eye. Let’s dive into how you can make these beautiful ornaments!

Insider Tip
Here’s a little secret when it comes to making your sea glass Christmas tree ornaments: don’t be afraid to mix up the colors and textures of your glass! Using different shades of sea glass—like soft blues, greens, and even a pop of pink—will give your ornaments a more lively and dynamic look. Layering the pieces will also create a beautiful depth to your ornaments. And if you need some inspiration, a quick search online will show you loads of beautiful sea glass collections that can spark your creativity.
Coastal DIY Projects
These sea glass Christmas tree ornaments are just one example of the many amazing coastal DIY projects you can create. If you love the beachy vibes, you can get even more creative by combining sea glass with other natural materials like seashells, driftwood, or sand. Think about making an assortment of ornaments with different shapes and sizes—some with small, round pieces of glass, others with long, thin shards. This will add a lovely variety of texture and color to your tree. The best part? These DIY projects are all about embracing your creativity and making them as unique as you are!
Resources
If you’re looking for more ideas to decorate your sea glass Christmas tree, there are so many wonderful resources out there! Websites like Pinterest are filled with beautiful, easy-to-follow tutorials for making sea glass ornaments. You can even watch videos or join online crafting communities where people share their DIY projects, tips, and tricks. These resources will help guide you through each step and inspire you to try new ideas for your own sea glass Christmas tree.
Once your sea glass Christmas tree ornaments are finished, you’ll have a stunning set of decorations that bring the warmth and beauty of the beach to your home this holiday season. Happy crafting!
How do you make this sea glass Christmas Tree DIY?
Making your own sea glass Christmas tree is a super fun project, and the best part is that it’s much simpler than it looks! Not only will you enjoy the crafting process, but you’ll also have a beautiful, coastal-inspired decoration to show off this holiday season. Let’s walk through the steps together to ensure your sea glass Christmas tree turns out just right!
Step 1: Gather your supplies.
Before you get started, take a few minutes to gather everything you’ll need for your sea glass Christmas tree. Here’s a quick list to make sure you’re ready:
- A foam cone (this will serve as the base of your tree)
- Sea glass (you can find some online or maybe even collect your own from the beach)
- A hot glue gun and glue sticks
- A starfish or any other lovely topper you like
- Scissors (for trimming the glass pieces if needed)
- Optional: Glitter, beads, or seashells to add some sparkle
Once you’ve got all your materials in place, you’re ready to begin!
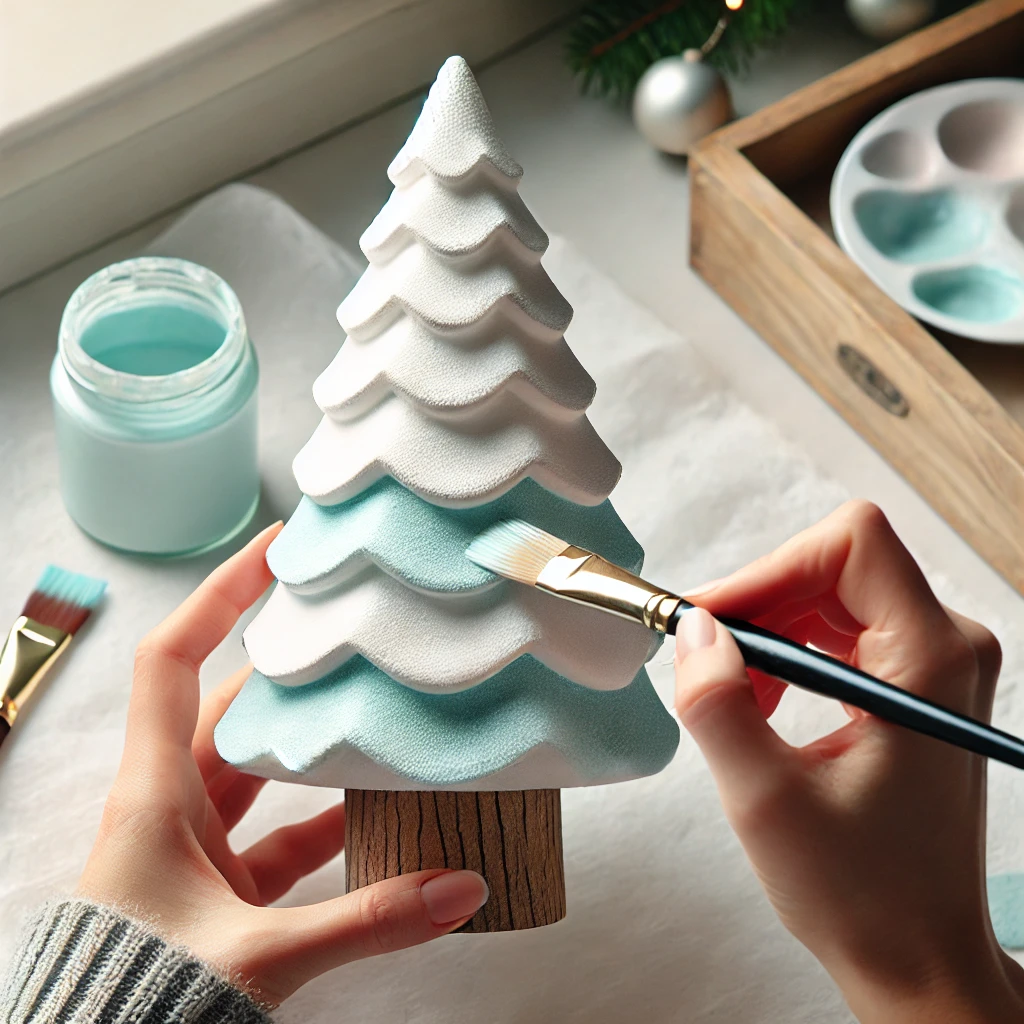
Step 2: Paint your foam cone.
If you want to add an extra layer of elegance, start by painting your foam cone. While this step is totally optional, a soft coat of white or a shimmering color can help the sea glass stand out. You could even add some glitter to make the base of your tree sparkle! Let the paint dry completely before you move on to the next step, ensuring a smooth and clean surface to work with.
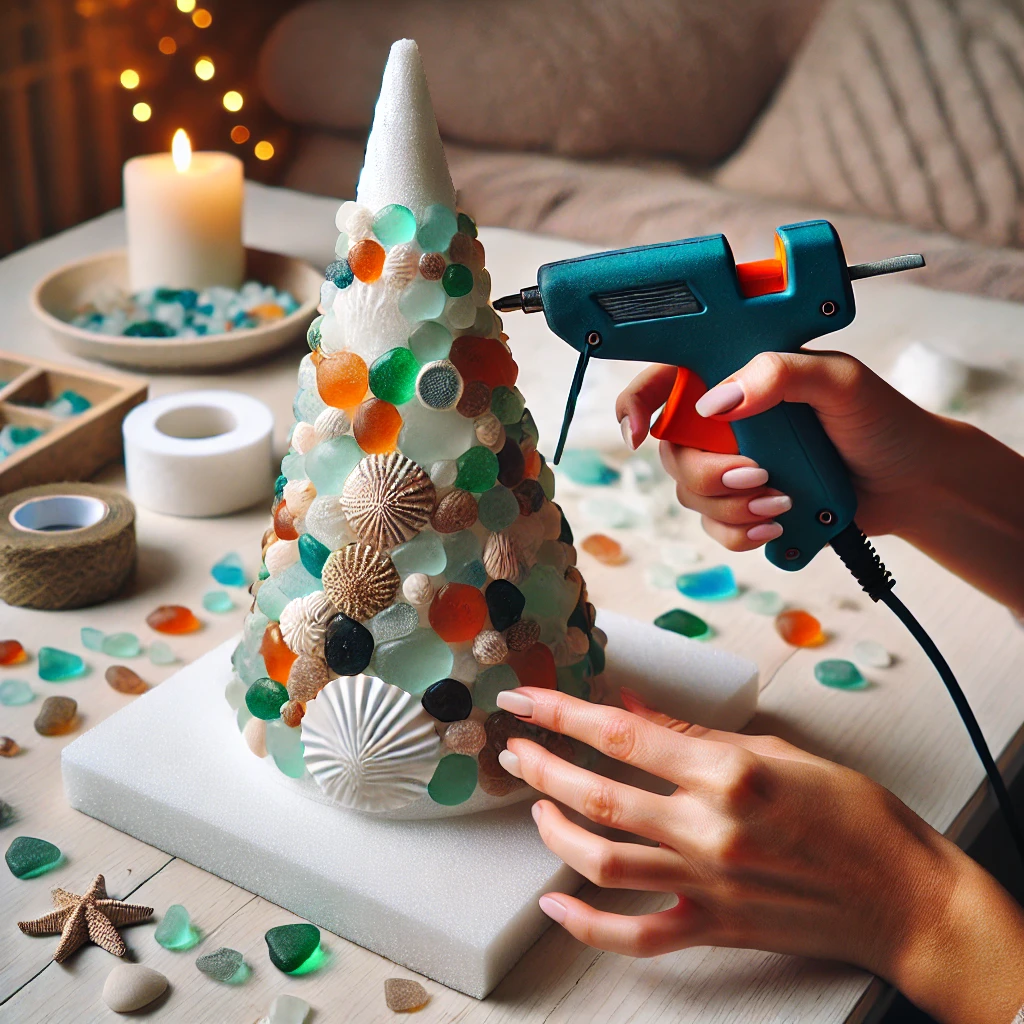
Step 3: Glue on your sea glass.
Now comes the fun part: gluing your sea glass onto the foam cone! Start at the bottom and work your way up, applying a little hot glue at a time. Press each piece of sea glass into the glue, making sure they overlap slightly as you go up the cone. This will hide the foam base and create a seamless, stunning look. Feel free to mix different colors and shapes of sea glass to add depth, or keep it simple with a monochromatic theme for a more minimalist effect. Keep adding layers until your foam cone is fully covered.

Step 4: Add a starfish.
Once your tree is beautifully covered in sea glass, it’s time to add the final touch: the starfish topper! A starfish brings the perfect coastal vibe to your tree, but feel free to get creative. You could also use a seashell, a small star ornament, or even a ribbon bow. Just make sure to glue the topper securely at the top of the tree to complete the look. This little detail will make your sea glass Christmas tree feel extra special and personalized.

Will hot glue actually work?
Absolutely! Hot glue works wonderfully for this project. It dries fast and holds everything in place. Just make sure to apply it carefully and avoid any messes. It’s a great option for gluing sea glass to the foam cone, and it’ll keep everything nice and secure once it sets.
Is it fragile?
Since sea glass can be a bit delicate, it’s important to handle your tree with care. But don’t worry, with a little attention, your sea glass Christmas tree will stay intact. Make sure you place it somewhere safe, away from heavy traffic areas, to avoid accidental bumps or knocks. And remember, this tree isn’t just beautiful—it’s a unique piece of coastal decor that you’ll enjoy for many holidays to come.
Now that your sea glass Christmas tree is complete, you can step back and admire your work! It’s a gorgeous, beach-inspired addition to your home that will definitely add a bit of coastal magic to your celebrations. Enjoy!
Your “Create Sparkling Sea Glass Christmas Trees in Simple Steps” DIY project is now ready to shine! It’s such a fun and creative way to add a coastal, beachy vibe to your holiday decor. Not only will you get to create something totally unique, but you’ll also get to show off your creative skills with a beautiful sea glass Christmas tree.
As you carefully glue on the sea glass and add that perfect topper, you’ll feel proud of the stunning tree you’ve made. Whether you go for colorful sea glass or a more minimalistic look, this project is all about making it your own.
Just remember, sea glass can be a bit fragile, so it’s important to handle your tree with care. Once you’ve placed it in a safe spot, it’ll sparkle throughout the holiday season, giving your home that perfect coastal charm. And the best part? Every time you look at your tree, you’ll be reminded of the fun and creativity you put into it.
So go ahead, make your sea glass Christmas tree, and bring some coastal magic into your home this season. Happy crafting, and enjoy every step of the process!
FAQs for Creating Your Sea Glass Christmas Tree
Can I use regular glass instead of sea glass?
While you can technically use regular glass, sea glass is the ideal choice because of its smooth, frosted texture that gives a unique beachy feel. It’s also more durable for this type of project. If you do use regular glass, make sure it’s well-smoothened to avoid any sharp edges.
Where can I find sea glass?
Finding sea glass is part of the fun! You can buy it online, or if you live near a beach, take a walk and see what you can collect. Sometimes, even thrift stores or craft shops sell sea glass that’s been specially collected and polished. Just be sure to pick up pieces that are safe and free of sharp edges.
Can I use a different base for the tree instead of a foam cone?
Absolutely! While a foam cone is the most common base, you can get creative and use other materials like a cardboard cone, a wooden dowel, or even a metal frame. Just make sure whatever you use is sturdy enough to hold the weight of the sea glass.
How long will my sea glass Christmas tree last?
With proper care, your sea glass Christmas tree can last for years. Make sure to place it in a safe spot where it won’t get bumped or knocked over, and avoid direct sunlight or moisture to keep the sea glass intact. The beauty of this project is that it will only get more sentimental over time!
Is this project easy for beginners?
Yes! This DIY project is beginner-friendly and perfect for anyone looking to add a personal touch to their holiday decor. The steps are simple to follow, and you can adjust the difficulty by adding more layers of sea glass or by customizing your design. Just go at your own pace and enjoy the process!
Can I make this tree with kids?
Yes, this is a great project to do with kids, but keep in mind that the hot glue gun can be dangerous. Make sure to supervise the use of the glue gun and let the kids help with gluing on the sea glass once the tree is prepared. It’s a fun, hands-on activity that’ll bring out their creativity too!